Toolbar Options
Each editor (including the timeline) has a toolbar at the top with various options to ease editing.

Timeline toolbar
スナップとグリッドのオプション
This menu button allows adjusting snapping and grid display options.
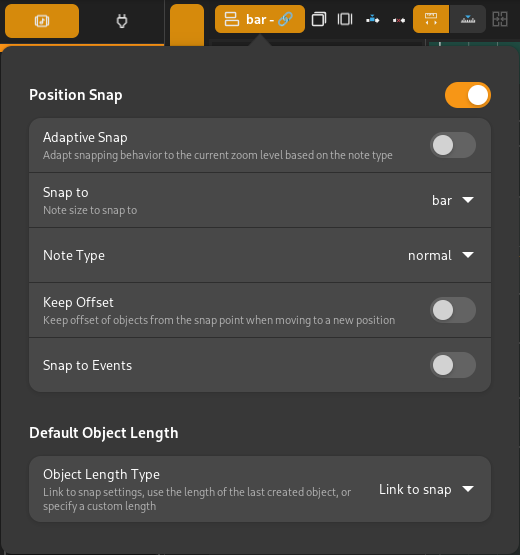
Snap/Grid options
Each option is explained below.
- Position Snap
Turn snapping on or off.
- Adaptive Snap
Automatically adjust snapping behavior to the current zoom level, based on the selected note type.
- Snap to
Note size/length to snap to. This is only visible if Adaptive Snap is turned off.
- 音符の種類
- Normal
Snap to the selected (or automatically determined) note length.
- Triplet
Snap to 2/3rds of the selected note length.
- Dotted
Snap to 3/2nds (1.5 times) the selected note length.
- Keep Offset
When snapping, keep the offset of objects from the nearest snap point on their left.
- Default Object Length
The length to use when creating new objects. The following options are available.
- Link to Snap
Use the same note length as the snap length above.
- Last Object
Use the length of the last created object.
- Custom
Specify a custom length.
量子 化
クオンタイズ アクションとクイック クオンタイズ アクションを使用して、オブジェクトを指定された位置クオンタイズできます。

クオンタイズ
Clicking the Quantize button will open up a popup that will let you specify the settings to quantize the current selection with.
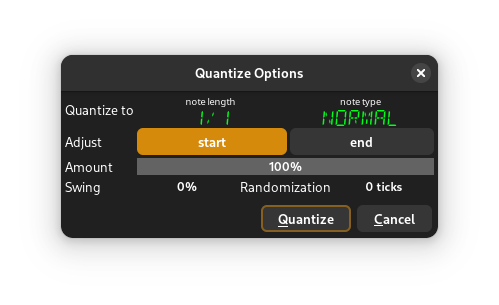
- …にクオンタイズ
クオンタイズするノートの長さと種類を選択します。
- 調整する
開始位置、終了位置(長さを持つオブジェクト)、またはその両方をクオンタイズする場合に選択します。
- 量
クオンタイズする量を選択します。100%の場合は指定されたオプションに完全にクオンタイズされ、0%の場合はクオンタイズされません。
- スイング
スイング量を選択してください。
- ランダム化
これは、結果として得られる位置を指定されたティック数でランダム化し、クオンタイズされたイベントに "人間味 "を加えるのに便利です。
Quantizeをクリックすると、クオンタイズが実行され、Quick-Quantizeで素早くクオンタイズするための設定が保存されます。
クイック・クアンタイズ
これは、最後の既知の設定に基づいてクオンタイズを実行します。
Playhead Tracking
Zrythm includes functionality for forcing the playhead to remain inside the visibile area during playback.

Playhead tracking controls
- Scroll when Playhead Reaches Edge
Automatically scroll the visible area when the playhead moves outside it
- Follow Playhead
Keep the visible area centered at the position of the playhead
ズーム
The timeline and each editor include horizontal (and sometimes vertical) zooming functionality.

Zoom buttons
- ズーム イン
Zoom in at the location of the playhead
- ズームアウト
Zoom out
- オリジナル サイズ
Zoom back to the default zoom level
- ベストフィット
Zoom in or out as much as required to show all of the events in the arranger
Event Viewers
Clicking the Toggle Event Viewer button will display an event viewer (or list editor) that shows all events in the corresponding editor as a list.
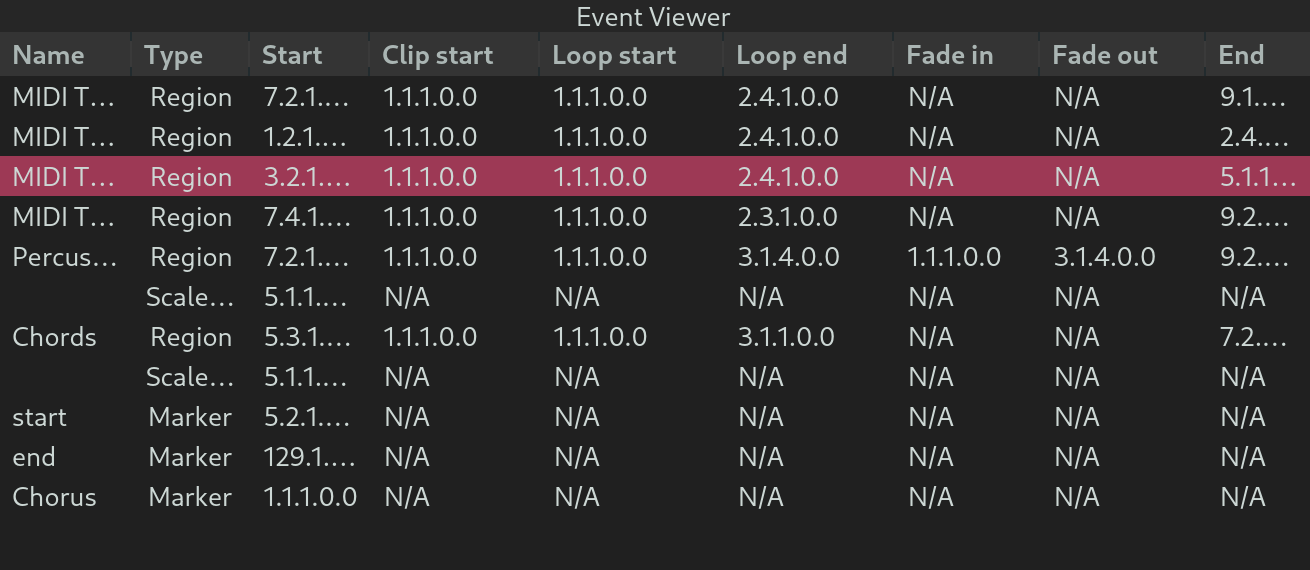
Timeline event viewer
並び替え
Columns in the header row can be clicked to sort the events in ascending or descending order.
編集
Some values can be changed by clicking in the corresponding field to enter edit mode, then pressing Enter when done.

Edit mode
Object Selection
The object selection in the event viewer is linked to the arranger. This means that selecting objects inside the event viewer will also select them inside the arranger and vice-versa.
Timeline Controls
The following controls are only available in the timeline toolbar.
Range Operations
Range actions are performed on the selected range.
- Insert Silence
Insert empty space at the selected range and push all events in the range forward.
- Remove Range
Remove all objects inside the selected range and move events after the range backwards.
Object Merging
Clicking this button will merge the selected regions. This button is deactivated when merging the currently selected regions is not possible.
The shortcut for object merging is Control-j.
Piano Roll Controls
The following controls are only available in the piano roll (MIDI editor).

Piano roll toolbar
Chord/Scale Highlighting
The highlighting option can be used to highlight notes corresponding to the scale, chord, or both at ther start position.
The position of the playhead will determine highlighting of the piano roll keys on the left side of the piano roll.
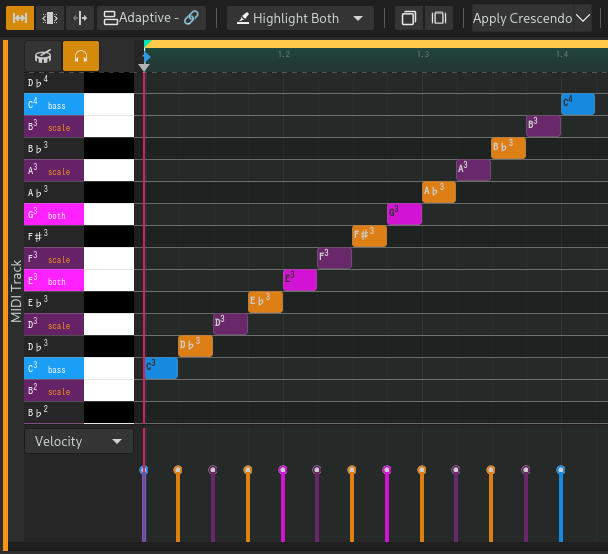
Scale and chord highlighting
Separate colors are used, in order of priority based on the following:
The note is the current chord's (if any) bass note
The note is both inside the current chord (if any) and the current scale (if any)
The note is inside the current chord (if any)
The note is inside the current scale (if any)
The note is neither in the current chord or scale, or there is no current chord or scale
参考
See the Chord Track, Chord Editor and Chord Pad for details.
MIDI Functions
MIDI functions are logic that can be applied to transform the selected MIDI notes. The following functions are available.
- クレッシェンド
Gradually increase the velocities of the selected notes from low to high. Used to create a climax.
- フラム
Create additional MIDI notes right after the start position of each selected note. This is usually used on snares.
- Flip
Reverse/flip the selected notes horizontally or vertically.
- レガート
Connect all selected notes so that they play smoothly.
- ポルタート
Similar to legato, but leaves some space between the notes.
- スタッカート
Make the selected notes short and punctuated.
- Strum Up/Down
Shift the position and velocity of notes that start at the same position (chords) to simulate strumming, like when playing guitar.
課題
Add illustrations.
In the future, it will be possible to implement custom functions using user scripts.
Ghost Notes
By default, Zrythm will only display MIDI notes in the selected region. Clicking the mask buton will ghost (display with less opacity) MIDI notes from other regions in the same track.
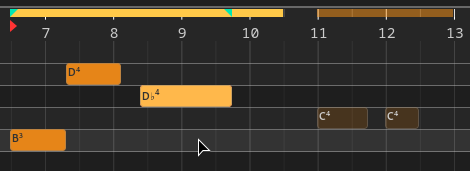
Ghosted notes on the right
Clicking on a ghosted note will automatically switch the active/selected region to the clicked MIDI note's parent region.
Automation Editor Controls
Automation Functions
Automation functions are logic that can be applied to transform the selected automation points/curves. The following functions are available.
- Flip
Reverse/flip the selected automation horizontally or vertically.
Audio Editor Controls
Audio Functions
Audio functions are logic that can be applied to transform the selected audio part. The following functions are available.
- Invert
Invert the polarity of the audio.
- Normalize Peak
Normalize the audio so that its peak is 0dB.
- Linear Fade In
Fade the audio from silence to full amplitude.
- Linear Fade Out
Fade the audio from full amplitude to silence.
- ナッジ
Shift the audio by 1 sample backward or forward.
- Reverse
Reverse the audio (play back backwards).
- External Program
Run an external program (such as Audacity) to edit the audio.

Edit the selected audio in an external app
The selected program will be run with the path to a temporary file as an argument. Normally, the application will open that file, otherwise you will have to open it manually.
ヒント
You can select and copy the path in the dialog.
Once you've made your changes to the file, close the external app and press OK. Zrythm will then apply your changes to the selected audio part.
重要
The length of the audio must stay exactly the same, otherwise this operation will fail.